Sunday 23 August 2015

Shift dress version 2.0

I drafted this post a couple of weeks ago but never got around to publishing it(hence the rather summery footwear!). Better late than never though ... Here's my second attempt at that shift dress. 

I am feeling rather pleased with myself this week. I retried the shift dress that I was so disappointed with a couple of posts ago- but this time I kept it simple with a plain cotton - and it's turned out great! I even wore it to the office. Can't tell you how huge that is. I have never worn anything I've made into work before. I got a compliment too!!!

Check it out:


I don't have much to say about making it. I followed the pattern exactly and it went pretty smoothly. The only downside is that the fabric isn't at all special. Just a cheap plain cotton. But that meant it was easy to work with and I wasn't scared of making mistakes. So now my confidence levels are up again and I am ready to experiment agin. 

Beach Skirt ... On a Real Life Beach

Just a cheeky note to show that I did actually wear my *cough* competition winning skirt on the beach this summer ...


Tuesday 4 August 2015

Riviera Style

A few weeks ago now I went to the Riviera Style exhibition at the Fashion Museum on Bermondsey Street in London. It's a really great exhibition, displaying swimwear from the end of the Victorian era until today. It's a thoughtfully currated exhibition with some truly beautiful and genuinely interesting pieces on display. The thing that struck me most was the apparent speed with which people went from modestly covering as much flesh as possible on a trip to the beach to super glam, surprisingly slinky bikinis. Apparently, this is a result of the popularisation of sunbathing in the 1930's. Before this, the outfits had been exclusively for bathing. I also think it has a lot to do with radical changes in society; attitudes towards women in particular and I think that it is in no small part thanks to that generation of  bright young things who were challenging old fashioned conventions.  

As ever, the early to mid twentieth century appealed most to me, but here's a selection of photos I took  throughout all of the ages on display. It's only on for a couple more weeks, so get there if you can!


Sunday 2 August 2015

Home Improvements

Holidays. Time for some rest, relaxation and ... catching up on my blog! Finally I've got a chance to show you a project I finished quite a while ago!  

One of the best things about the house that we moved into almost a year ago now is that it hasn't needed anything big or expensive doing. No new kitchen, bathroom, boiler... We should probably replace the windows, but we can live with them for now. And that's great, because we haven't got any money. The problem is that everything's so UGLY! But it's amazing what a coat of white paint and a bit of bright fabric can do!  

Case in point : Clinging on for dear life to the back of the house is a 'conservatory'. It's not, nor has it ever been the uPVC dream of suburban grandparents everywhere. It's more akin to a rotting green house really. But it's a useful space for the washing machine and lawn mower and we'd be lost without it. It is however through this room that people have to pass to get to my pride and joy (the garden). So, once the garden was done up it was only fitting to improve this room as much as possible too. A coat of white paint over the rotting timber frame and some masonry paint over the (single skin) of brickwork and the structure was looking better already. We then raided IKEA for some cheap storage for the garden tools, toys and the other random junk that always finds its way into rooms like this. One of the units we bought was the xxX, which can be used as a seat as well - it just needs a cushion. 

And with that, we finally we reach the sewing!!! I made this cushion cover.


 I pretty much followed May Martin's 'Sewing Bible' instructions for box cushion covers, but I omitted the piping. Is it just me who hates piping on cushions? It's only good for catching crumbs!! The fabric is this beaut from Fabric Rehab. I got the foam for inside the cover is from here. They can cut you a piece of foam to whatever size you need. 

To make the cushion I cut out the following pieces from my fabric:

One piece the size of the top of the foam and one the size of the bottom (plus 1.5cm all the way around)

One piece the size of the front side of the foam, one piece the size of the left side and one piece the size of the right hand side - each with an extra 1.5cm all the way around. 

Two pieces the same length as the back of the foam, but half the depth, plus 1cm on one of the long edges and 1.5 cm around the other edges. 


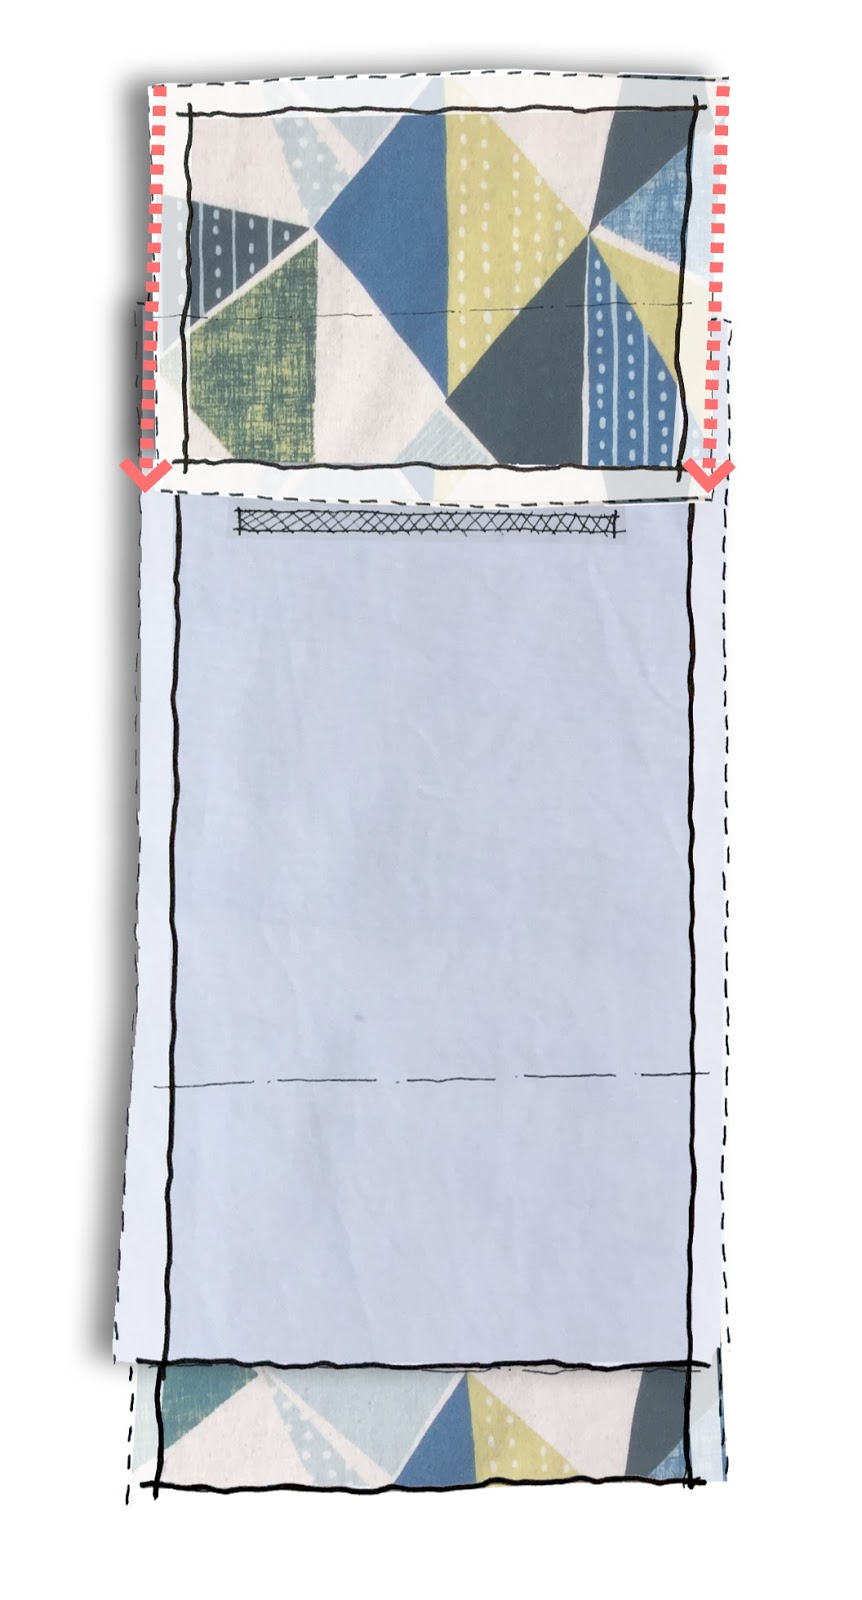
I took the two long pieces that I cut half the depth of the foam and pinned them right sides together. I then marked the length of the zip along the pinned edge, starting in the centre and sewed the pieces together from the outside edges to the marks showing the ends of the zip using a 1cm seam allowance. 


Next, I inserted the zip into the gap, one cm from the edge of each piece. Once that was done, I took the piece with the zip in and pinned it, right sides together, to the other pieces that would eventually run around the edge of the cushion. I sewed them together with 1.5cm seams to make a band that runs around the whole cushion. 


The only tricky bit came next. I took the two remaining pieces of fabric (the bigguns that would eventually become the top and bottom of the cushion) and pinned them, right sides together to the continuous band. The important thing is to catch all three seams at each corner. Trim each corner once you're done to remove as much bulk as possible. 

If you try this, make sure that you have the zip a little bit open at this point. 0therwise you'll end up with it on the wrong side of your cover and you won't be able to open it at all without some serious effort. You need to be able to open it in order to turn the cover so that right sides face out. But once that's done, all you have to do is stuff the foam in. And it's DONE! 

Here's some more pictures. You'll see that it's a bit wrinkled because it's slightly too big. I tried sewing the seams a bit tighter, but it's still baggy. But it's not too bad, so I'm going to leave it for now and just enjoy the view of my garden. 


.... And here's one I made earlier... Before I started this blog, one of the first projects I completed was a seat cover for our bay window, which I thought I would share a couple of pictures of too. 


Sunday 5 July 2015

Crest of the wave

What a week! First I win the #simplicitybloggerchallenge (have I mentioned that yet?!), then I successfully complete a really quick, easy and effective sewing project. I've made a new cover for my IKEA POANG chair. You know these beauts? They're cheap, comfy and not all that ugly. A lot of people I know have one. Our's was plain and looking a bit tired. I should've taken a 'before' photo, but I forgot. So you'll have to imagine it ...  it was beige-tactic, accented with a few unidentified stains.

And now it looks like this!!!


Wowser! I am so please with the result. The key is, of course, the A-MAZING fabric. It's a cotton canvas from Fabric Rehab (again!! - they are fast becoming my absolute favourite). You can find it here. Unlike that stretchy jersey that I tried to make a dress out of a few weeks back, I absolutely nailed the fabric choice here. It looks stunning, it's comfy to sit on and I'm pretty sure it will be hard wearing. 

So, how did I achieve this transformation? Firstly, it was super easy, so I shouldn't gloat too much. I based it on the step by step instructions in this  blog from Stickleberry (thank you!), but I changed it up just a bit so that I could use a plain fabric on the back. You see, my theory is that this project needs an amazing fabric (otherwise you might as well just buy a new cover from IKEA). But amazing fabric is expensive. Sooooo, I wanted to use the patterned canvas for the front, and then finish the back with plain cotton. That cut the cost of the fabric by about a third, so it was well worth doing. BUT, there are a few important measurements to keep in mind if you want to do the same. I'll highlight them below...

I didn't take any photos of the process as I went along, so I've drawn seem diagrams instead. This was a really fun to do, so I might do it for more of my blog posts in the future. Let me know if you like it -or if you hate it I suppose. But don't be too mean!

Step 1 : Measure your existing cushion and cut out your fabric


The important thing here was to make sure that I had enough patterned fabric to wrap around the head-rest and down the back of the cushion a little way. I nearly messed up here and had to sew an extra rectangle of fabric onto mine - fortunately you don't notice it  now it's finished. I allowed an extra 4cm at the end of each piece, so that the ends that would be eventually exposed could be hemmed neatly. Then I inclded 2cm everywhere else as a seam allowance. This is a generous seam allowance, but I wanted to play it safe to accommodate any measuring mistakes!

You should also allow enough plain fabric for there to be an overlap once your cover is finished. 


Step 2: Sew fabric together


This step is easy - I just had to sew the two ends of the fabric together! That's it. 


Step 3 : Put cushion on top of fabric


This is easy too. I laid the existing cushion on top of the fabric, with the  right side of the fabric and the back of the cushion both was facing up towards me. The important thing here was to get everything lined up right so that the fabric would wrap around far enough at the top and the bottom of the cushion.


Step 4 : Wrap fabric around cushion 


So now I could wrap the fabric around the cushion. I tried to make it as tight and even as possible. I then pinned the layers together from the bottom fold to the point where the two fabrics overlapped. 


Step 5 : Velcro


Next, I took a piece of velcro and pinned it in place on the right side of the fabric - making sure that it will be able to attach to the corresponding velcro on the existing chair. 


Step 6 : Remove cushion and sew

That's almost all there was to it. The next step was to remove the cushion and stitch up the part that I had pinned together (i.e. from the bottom to the overlap). Then I pinned together the top bits and sewed them together.


Step 7 : 'Clip and sew' the corners


So that the cover would sit neatly around the curved corners of the existing cushion, I stitched diagonal lines across each corner, and then clipped them just outside this line. Apparently shearing scissors are the best tool for this job, but I don't have any. So I cut a straight line and then zig zag stitched along it with the overlocker foot.


Step 8: Stuff your cushion in

Then a bit of  a press and that was it. I stuffed the cushion into the cover and I was done. BOOM!


Thursday 2 July 2015

Fanfare Please...

So this is a blog post I never thought I'd need to write. 

Do you remember the Simplicity Blogger Challenge I entered a couple of months ago? Well, they announced the winners today and ...  quite unbelievably ... I only flippin' well went and won the newcomer category! I'm not really sure what else to say about it. I'm completely flabbergasted and really grateful. It's given me the kick up the ar$e I needed to keep on sewing and keep on blogging!  I'll admit that the summer sun and my enthusiasm for the new garden have somewhat distracted me lately. As  result, my output has been - let's say - 'found wanting' lately. Well, not anymore! Time to put this renewed vigour into action!!! I'm working on a new post as we speak - and trying out a new approach to the way I present my blogs. Watch this space...


Monday 8 June 2015

On Running Before I Can Walk.

I have news. This might come as a bit of a shock, but Jersey and I have decided to go our separate ways. We need some time apart. We're just not compatible right now. It's not Jersey, it's me - I wasn't ready for such a big commitment. I thought I could handle it, but I was wrong. Maybe if I was a bit older, a bit wiser, a bit more patient... 

Oh god! I've been such a muppet. I did always know that stretchy Jersey would be a different beast to the cotton I have been sewing with until now, but I fell in live with the stripes. And the colours. Oh those colours!  I didn't really think it through when I bought it and by the time I realised what I'd done it was too late. So that's when I started lying to myself. How hard could it be?

Even after I'd started sewing I had myself convinced it was going fine. And maybe it was for a while. I merrily sewed away, all the while thinking to myself 'what's all the fuss about?' ... and ... 'It's no different to cotton'!!! I'll say it again- I'm a muppet. But to be fair to myself, the darts did go in fine, and the side seams were fine (if a little curled around the edges). See - it looks pretty good from the front (except for the creases - I did press it. Promise!):


But then came the bloody zip.

How could I be so naive?! After two attempts I basically gave up. It's so lumpy you could mistake it for the Pennines. I could have tried inserting it again. And again. And again. But to be honest I knew how it would turn out. No matter how many times I tried it was destined to be lumpy!


And that's not even the worst of it.

Look at this!!!

The neckline has been so stretched out of shape by my butchering that it sits about 3 miles away from the back of my neck. I have got absolutely no idea how this happened, but it looks ridiculous! I can't wear it like this, so I'm going to have to find it in myself to go back, and make some changes. I am envisaging taking the zip out all together and sewing up the centre back seam. The neck line's certainly big enough to get over my head. It will probably only make it worse, but what have I got to lose?!


Ps. I can't imagine why you'd care, but the shift dress pattern I used was Simplicity New Look 6176, and the fabric is this Ponte Roma Jersey from Backstitch. 

Sunday 31 May 2015

Least Interesting Blog Post of All Time

*WARNING* The post that follows will not be at all intersting. It will, mercifully, be short.

Over this last week I made 10m of bunting out of fabric scraps. I made it for my daughter's birthday party this weekend... I love making bunting. It's so easy, but so effective and summer fete-y. Which is quite kitsch I suppose!! I've compromised my very own raison d'etre with 10m of bias binding and some left over fabric!


I made it by cutting out triangles, sewing their wrong sides together, turning them right sides out, pressing them and then sewing them into the fold of a long piece of shop bought bias binding.  Just one d'oh moment when I managed to miss one of the flags and just stitched the bias binding together! To fix it, I simply needed unpick the bias binind and restitch it more carefully with the flag in place.

I've also been working on the shift dress in the jersey fabric that I mentioned at the end of my previous post. It was going spiffingly until I had to add the zip. That was very hard and it might just be an in unpickable disaster! I'll return to it over the next week and let you know!

Sunday 17 May 2015

Reasons to be Positive

Within minutes of of publishing my last post, a number of people who I admire and respect wrote compassionate and inspiring pieces about the importance of not getting angry and the power of positive action. So now I really do feel guilty about my rant last week... I'm not going to delete it because it will serve as a reminder to me not to wallow but to DO SOMETHING. But what? I've spent this week looking for positive responses to the election and complied this short list:

Owen Jones has begun what I'm calling a crusade for hope over the last week. As he says, it "comes down to a clear message of hope – exactly what the SNP offered in Scotland. The politics of fear might seem pretty invincible now". He is great. Watch this and get inspired (and, if you're anything like me, indulge your silly crush Owen):

While you're on You Tube (and while we're talking about my silly crushes) you should also check out Jake Yapp's "All Mouth" videos. They started out as "All Mouth and No Trewsers" - a response to Russell Brand's you tube channel "The Trews" (which I also really enjoy and throughly recommend), but he's also posted a message of positivity and understanding and an interview about proportional representation.

Jessica Hynes used her 'best female comedy performance' speech at the BAFTAs to slam austerity and promote the Arts Emergency charity. She is also offering 20 days of her time to 20 state school drama departments to encourage young actors/writers into her profession. If you're reading this, I assume it's because I tempted you here with talk of sewing and craft and those little acts of human creation that we hold so dear. No, they can't always be commoditised - but they are always worth doing.

Abi Wilkinson wrote this piece for the mirror. A direct,  to the point and very useful list of 7 things you can actually do to make a difference if you oppose this government. I'm at 5/7.


I've also dusted myself down, ordered some new fabric and got the sewing machine out again. Whilst its not going to bring down the government, it does make me feel good. I've been making bunting out of fabric scraps or upcoming birthday parties and cutting out the pattern to make a shift dress out of this lovely (but a bit scary) Ponte Roma Jersey from Backstitch. This will be the first time I've worked with Jersey.  I'm terrified. Wish me luck (and note the use of tinned tomatoes to try and keep it from moving!!)


Saturday 9 May 2015

I Don't Get It

I'm not going to blog about sewing again this week. Not just because I haven't done any (which I haven't), but because something more important has happened and it's all I can think about. #GE2015. I've never had the courage to write about politics before. I've wanted to. I've drafted things. But I've always been too scared about getting into arguments with people who know better than me, or, well, of just looking a bit silly. Well not anymore.  That all changed yesterday. I don't care if I look daft or naive or people argue with me. I'm angry and I'm disappointed and I feel compelled to write about it. And I'll fight my corner if I have to. I want to do something. I don't know what that is yet. But something. And this is the start.

You'll need a tiny bit of background before I launch straight in. I'm a Labour supporter. I voted Labour on Thursday and I genuinely thought change was coming. I didn't think it was going to be easy but I did think there was a chance. Maybe we'd have to vote against a Cameron Queen's Speech as he tried to cling on to power. Maybe we'd have to rely on the SNP and the Greens to get ours through. But I thought we could do it.

And then the exit polls came in. And then the result came in. And I was crushed.

I DON'T GET IT!

I don't get the SNP landslide. To those who voted for them, what were you hoping for? Was it independence? Rightly or wrongly, at the referendum in 2014 you voted against independence. You can't think that the Tories (who you've let in) are going to be offering up another referendum any time soon? Even with your 56 MPs ... And especially now it seems Scottish Labour are no threat anymore. Or was it the desire for a progressive left wing government? I can understand that.  But, well, that's well and truly scuppered now too. Labour might not be as progressive as you want, but surely a better result would have been a centre left party that could have been pushed further once the Tories were out. Instead we have five more years of this awful right wing agenda. And left wing Scots are left as unrepresented in government as the Labour, Green and Plaid supporters are down here. Which brings me on to my next point...

I don't get a system where the representatives elected by an entire country (that's you Scotland) and the majority of the representatives elected by one of the world's most influential capital cities (down here in London) will not form any part of a majority (all be it a tiny majority) government. We're forever being told that the  the UK is too Londoncentric - that London has too much influence and power. It doesn't feel like it right now. If anything, London shifted further to the left on Thursday. So what do our votes mean? What are they worth? Talking to people down here, it is almost impossible to imagine why others elsewhere would ever vote Tory. Especially after the last 5 years. Perhaps that's why their supporters are all so bloody 'shy'...

I don't get Shy Tories. If you're too ashamed or embarrassed to admit which party you are going to vote for (even to a complete stranger who's trying to compile an anonymous poll) then you are voting for the WRONG party. If you know deep down that voting out of some misguided self interest for the Tories is the wrong thing to do, then you shouldn't do it. Or, at the very least, you should have the balls to admit that you really are 'that kind of person'. Because your coyness makes a difference. I think that the polls published during the campaign, with predictions based on your bashfulness, influenced the results. I don't really think that all of those Scots would've voted SNP if they had realised that it would result in a Tory government. I think they saw the polls and, understandably, interpreted them to mean that a Tory majority was impossible and that their SNP MPs would be able to support (or even improve) a Labour government. We don't have secret ballots in this country to stop your neighbours finding out that you're a mean, selfish coward. We have them to prevent voter intimidation. Sadly they can't prevent voter indoctrination ...

I don't get why so many people still trust the right wing media. Wasn't the awful pantomime of the  phone hacking saga enough to show that these organisations and their all powerful leaders are beneath contempt? Their lies and propaganda are continually exposed, but people keep swallowing their crap! Some have argued that their power is diminishing, but the way I see it is that their reach continues to cross class and wealth divides in a way that social media doesn't (just imagine what a room filled by readers of the Sun, the Times, the Daily Mail and the Telegraph would look like). By its very nature, social media only to shows you the views of people you chose to 'follow' or 'friend'. As such, all it does is reinforce your own views. It was this 'echo chamber' effect on Twitter that gave me so much hope that the result would go the way I wanted. On the other hand, the right wing media promotes the views of a powerful, rich elite who are nothing like you, but who use their vast resources to make you believe that they are. This sort of brainwashing is one of the only reasons I can think that people (or at least people who are not in the top 1% who the Tories actually represent) would ever vote Conservative.

And finally, I don't understand why any former Lib Dem voter would turn Tory. Don't get me wrong, I get why you wouldn't want to vote Lib Dem anymore. After all, they did break that pledge on tuition fees. But what sort of tortuous train of thought that gets you from that to voting Tory. It can't be the principle of raising tuition fees that's got your goat because that was a Tory policy. So in that scenario, voting Tory would make no sense. So it must be anger at the broken promise. Again, I get it! It must have been a low, low blow. But you must realise that the Tories have broken their pledges too. Ladies and Gentlemen I give you : cuts to front-line services; increased VAT; means tested child benefit; top-down reorganisation of the NHS; the abolition of Education Maintenance Allowances; the closure of 566 Sure Start centres;  the abolition of the Future Jobs Fund; and for heaven's sake, whatever happened to "Vote Blue Go Green"?!

So where do I go from here? Two of my initial plans (formulated in a haze of disappointment and tiredness on election night) were to either move to Scotland (not really sure what this would achieve) or to establish the London Independence Party. I was basically fantasising about independence for compassionate,  empathetic, understanding, progressive London and screwing all the self interested Tories in the Home Counties. The bankers and hedge fund managers would need their passports to get into the city each day and they would have to pay a hefty fee for a work visa. I'm so tired of the rest if the country stereotyping Londoners and unfriendly and uncaring. So we're not a bunch of smiling goons embracing strangers each morning on the tube. At least we're actually on public transport rather than each being cocooned in our own horrible, polluting little cars. And this election has shown that do we care about what really matters. We vote for each other, not just ourselves. We welcome others. We're not scared of change. But that's just a daydream borne out of anger and resentment - neither of which are good motivations for anything, least of all a new political movement. So, for now, the best  I can do is stay informed and try to get active. I'll keep blogging about sewing and gardening and lovely things like that because it's really important to share the nicer things in life. But I'm also going to do what I can to fight for electoral reform. And an end to this TTIP thing - which sounds so evil I still can't believe it's real.

Monday 4 May 2015

Simplicity Blogger Challenge


Remember when I mentioned a couple of posts back that I wanted to enter the Simplicity Star Sewist Challenge? Well here is that entry! 

Fittingly (as I'm sure you'll agree) I went for the 'Best Newcomer' category. This requires entrants to use Simplicity’s It’s So Easy 2286 sewing pattern "as a basis for your own bespoke creation".


As soon as I saw the pattern I knew I wanted to alter it. I just thought it needed to be a bit more funky ... So my idea was to transform it into a really cute little beach skirt to throw over a swimming cossie. I chose view D, but then altered the pattern to make it (quite a lot) shorter and to change the ratio of skirt to overlay. The idea is that the  skirt should give a dramatic flash of colour underneath the overlay rather than looking like a double layered skirt.

I began by making a practice version of the skirt out of curtain off-cuts.  Unfortunately, it went so disastrously wrong that you're just going to have to trust me when I say I did it. There is NO way I am going to publish any photographs of it here! If I were to desperately clutch at a few straws, I suppose I could claim that it was of some value to test the ways in which I wanted to alter the pattern - and it did at least force me to read the pattern in full before I started the final skirt - but other that that it was hopeless!

Selecting funky fabric on the other hand was fun!!! In the end I went for a striking monochrome print called  'Mounains and Valley' by Michael Miller for the overlay with a flash of bright yellow for the skirt underneath. I got both from Fabric HQ. A lot of fiddly trimming and decoration isn't really the 'not quirky, not kitsch' way, so instead I got some pre made, bright yellow bias binding to finish the bottom of the overlay and visually unite both layers of the skirt. A funky but uncomplicated palette.

Constructing the skirt was as easy as promised by the pattern. (I promise this is true - my practice version only went wrong because the fabric was impossibly thick and I was rushing through it). I only had two d'oh moments, (which is remarkable with my track record!) which I've captured in the step-by-step photos below.

Step 1:  Altering, Tracing and Cutting Out the Pattern. 

Easy street. I really concentrated hard on this bit to make sure that my alterations to the pattern were accurate, that I cut out the fabric as neatly as possible and that the pattern was vertical and straight at the centre of the overlay. This step went really well with no hiccups.


Step 2: Construct overlay.

Another simple and straight forward step (there's very little room for error anywhere in this pattern really!). I finished the side seams and hemmed the overlay neatly and my unpicker remained tidily tucked away in my sewing box. *** Don't worry, this unbearble smugness wont last much longer. ***


Step 3: Apply bias binding (D'oh moment No. 1).

This step began by applying to bias binding to the bottom of the overlay. Again, I did a really careful, neat job of it and I was feeling very pleased with myself ... until that is, I noticed the stitching for the hem. Now the pattern doesn't anticipate bias binding, it anticipates a thicker trim along this edge -  and that would cover up the stitching. The bias binding I used was too narrow and left the stitching fully exposed and, well, just plain ugly.


There was nothing for it. The unpicker had to be unsheathed. I unpicked all of the hem and restitched it in place using a slip stitch that is not visible on the right side of the overlay.


Step 4: Construct Skirt

Here, you just repeat Step 2, but this time for the skirt element. Again, there really wasn't much room for error and I managed it without any mistakes!

Step  5: Construct Waistband (D'oh moment No. 2)

At this point, the pattern quite clearly says "pin WRONG side of the overlay to RIGHT side of skirt". However, no matter how clear that instruction might seem, I still managed to get this wrong. It really was one of those inexplicable d'oh moments when , no matter how many times I checked what the pattern said, studied the accompanying diagram, held the pieces together, envisaged the final skirt... I still got it wrong! As the blurry, frustrated photograph below shows, I had RIGHT side of overlay to RIGHT side of skirt. D'OOOOOOOOHHHHHHH!!!


Frustratingly I had already basted them together before I realised my mistake, so out came the unpicker again.


Gathering these upper edges and creating the casing both went really well. This is the bit that I had anticipated having most trouble with (especially following the disastrous test version), so I took my time and didn't try to be clever. It paid off! (Who'd have thought it hey?!)


Step 6: The Big Finish

I hemmed the skirt and voila, my skirt was  finished. Here are some shots of me wearing it*.


* I have been desperately waiting for  a sunny day to take these photographs - to get that beach, summer holiday vibe I was going for. Pretty good for a May Day bank holiday in East London hey?!